The motivation of my website update is to have a satisfied galley to show my photos. So I know I what I want, I also know I know little about website building codes. Therefore I need to start from the beginning. This is a roughly 2-month story. Because I have tons of work to do at workday. I squeezed time out of my weekend to learn build website at Friday night and Saturday. It was a meaningful try, I am more looking forward to every Friday night than before.
Week 1 ( March 16th) - HTML5 Beginner
At the beginning, I tried to learn HTML code from textbook. I searched online and school digital resource. It was not hard to under stand the HTML language. But it was not as much help for my gallery design. There is a gap between the textbook and my goal.
Week 2 (March 23rd) - FancyBox Gallery
Another week, I changed my strategy. I began to search HTML5 related template from Github and I really found something good. I selected a template that using fancyBox gallery, which quite meets my requirement. Then I replace part of demo images, and found it was ok. So the next step was to find some framework that have a simple design.
Week 3 (March 30th) - Bootstrap and BlueImp Gallery
After using the fancyBox gallery, I am quite confident with the progress and focus on finding good template. I found the many templates are built on Bootstrap, a free and open-source front-end library. Some of the responsive website templates were fitting most of my needs. One photography website template has a Carousel effect, which inspired me to show some good photos with fullscreen effect. In addition, the header and footer parts are useful to me. But there are some CSS setting that I don’t understand. In this way, I need to search some from w3schools.
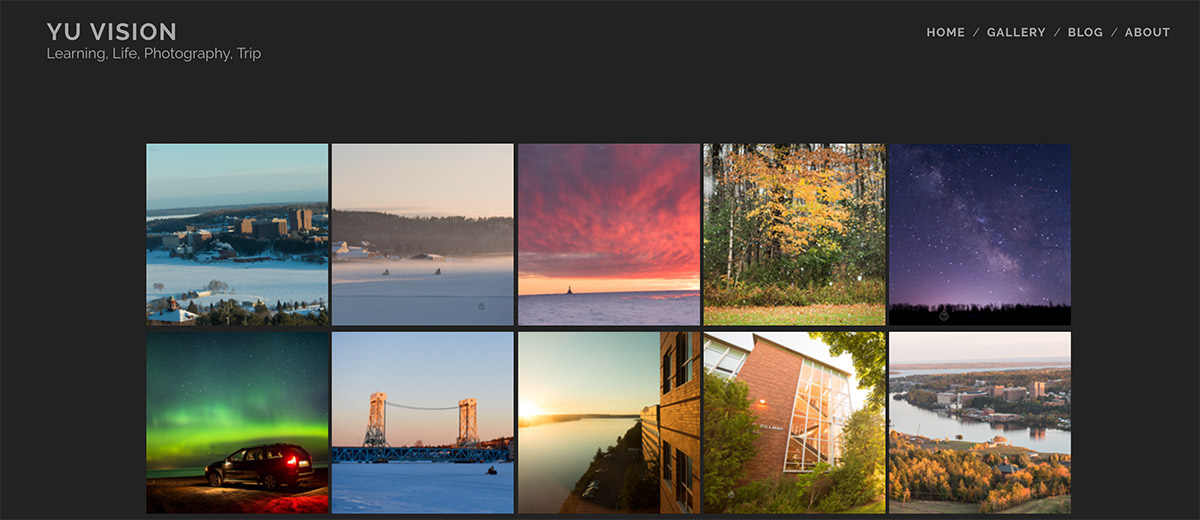
Another big discovery was that I found the BlueImp gallery, which is a very good gallery. It has rows of thumbnails. By clicking these thumbnails, it shows the image with larger size. What’s more, if you click on the picture, on the bottom of the picture you will find a series of picture indicators and you can jump to another picture by clicking on the indicator. Besides that, you can use left or right key (on the keyboard) to show another large picture. But one issue that, I could not find where are the external image links. This issue bothered me for around one week.
Week 4 (April 6th) - BlueImp Gallery External Image Links
After one week’s work, I went to office at Saturday morning and focused on analyzing the BlueImp code. I would never know that the external links can be cited so elegant. The author use flicker pictures and linked with several lines of code in Demo.js file. Hopefully, I will that advance skill in the future. But this week was quite busy, I need to stop after this.
Week 5 (April 13th) - Modified BlueImp Gallery
I modified and adopt the BlueImp gallery into my website. My modified BlueImp gallery has thumbnail with a large size than the original version. I am glad I can find this gallery. After input 20 photos, the gallery looked good.
Week 6 (April 20th) - Local Host, Hugo template, and Blogdown
I was using text editor to coding my website, and found a problem: the posts can not have the same style as the homepages because they can not find the css file. A way to solve is to add “/” at the found of the citation, such as <href=“/css/style.css”> and then set a local host on the computer. I used the Express package from the Node.js. Several lines with express varieties can set a local host. But it was new knowledge for me to set a local host. That’s good.
Another big problem before deploying was the blog pages, I was thought to write my post using test editors. But it turned out to be a tedious work. Then I am thinking that if I need a content manage system. I found a very interesting blog and can meet my requirement. It was dingyinwu.com. I was really want to us his template. But I found if I use his template, I will lost my BlueImp gallery part. That’s not I want. So I need to find another solution.
I found a simple but very good blog. The author is Yihui Xie. He wrote his blog for 13 years, and his website is very inspiring. When I read some of his post, I can not stop laughing. You can read his about page, which is very impressive. From his website, I known blogdown. Blogdown is a R package that help to create website with R markdown language. I learned a little about R, but I didn’t know R studio can build website. That’s so interesting!
The Blogdown was based on Hugo system but has friendly user interface. I am not sure which theme is fit for my website. I am struggling on selecting a suitable theme for hours. At last, I select a responsive theme for photograph. It was Nederburg theme for hugo. I learned a lot of new knowledge this week. But there still has something stand on my way. Because I know nothing about the hugo system.
Week 7 (April 27th) - Nederburg theme and Website Deploy
Starting from the Blogdown book, I learned some basic concept for Hugo system. After hours of trials and errors, I create additional pages by custom the type in front matter. There are lots of details I can not express in few paragraphs. In all, it is a not easy way to finalize my website.
I deployed my website on Hengtian Host, the domain are the same. Deploy the static website is easy than to deploy a dynamic website, such as my older version website that use Wordpress. Just need to upload the related website files on the root path.
In all, the domain is from Godaddy,website is hosted on [Hengtian Host] (http://www.hengtian.cc/), most of the photos are stored at Qiniu. The website was modified from Nederburg Hugo Theme. The fullscreen homepage was part of Bootstrap Code. The gallery, which is my favorite page, use the blueimp Gallery. At the last, this static website was generated by blogdown.
I am so glad that I make it.